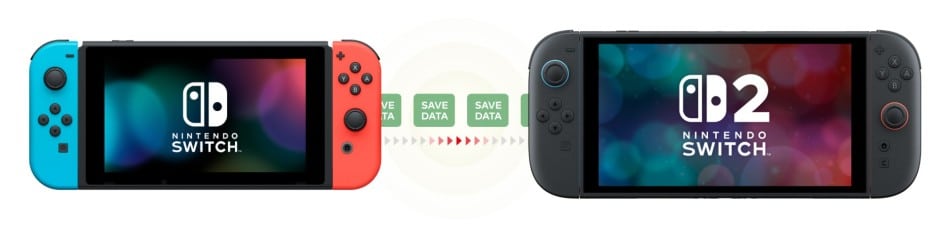
If you’ve just got a Nintendo Switch 2 or you’re getting one soon and want to move your data over, you’re in the right place. You probably want to keep your save data, downloaded games, and user profile from your current Nintendo Switch.
Thankfully, Nintendo has made that possible with two official transfer methods. One works when you have both consoles on hand. The other lets you upload your data to a server if you’re planning to trade in or reset your original system.
This beginner-friendly guide walks you through both methods step by step. You don’t need to be tech-savvy to follow along. We’ve written it so anyone can do it with confidence. It also covers what transfers, what doesn’t, and what to check before you begin.
Let’s take a look at what carries over to your new console.
Jump to a section:
- What Transfers and What Doesn’t
- Before You Start
- Option 1: Local Transfer
- Option 2: Server Transfer
- How to Cancel a Transfer
- Check Transfer Status
- Final Tips
What Transfers from your Nintendo Switch to your Nintendo Switch 2 and What Doesn’t
Before you start, it helps to know what moves over during the transfer and what stays behind. Here’s a quick breakdown:
What transfers from Nintendo Switch to Nintendo Switch 2:
- Save data
- User profiles
- Nintendo Account info
- Digital games and licenses
- Screenshots and videos (from the system album)
- System settings (like Wi-Fi and parental controls)
What doesn’t transfer from Nintendo Switch to Nintendo Switch 2:

- News data
- Bluetooth audio settings
- Time, date, region, and language settings (you’ll need to set these again during setup)
Digital games are tied to your Nintendo Account. After the transfer, you can redownload your games on your Nintendo Switch 2 by signing in with the same account.
Now that you know what to expect, let’s go over what you’ll need to get ready.
Before You Start
A smooth transfer starts with a little prep.
Here’s what you’ll need before you begin:
- Both consoles fully updated. Make sure your original Nintendo Switch and your new Nintendo Switch 2 have the latest system updates installed.
- Stable internet connection. You’ll need this for signing in and redownloading digital content.
- Charged batteries or plugged in. Keep both systems powered during the transfer to avoid any interruptions.
- Your Nintendo Account login. You’ll need to sign in on the new console, so have your email and password ready.
- Access to both consoles, if doing a local transfer. If you’re trading in your original system, go with the server-based option instead.
Before you begin, here are a few other things to know:
- The transfer is all or nothing. You can’t move individual users or partial save data.
- Digital games must be redownloaded. After the transfer, sign into the eShop with the same account to get them.
- Captured screenshots and videos will move over. These are included in the transfer.
- It’s a one-way move. Once the transfer is done, your data is no longer available on the original console.
- Server transfers can’t be repeated. You can’t upload the same data twice, so make sure you’re ready.
Once everything’s ready, you can pick which transfer method works best for you.
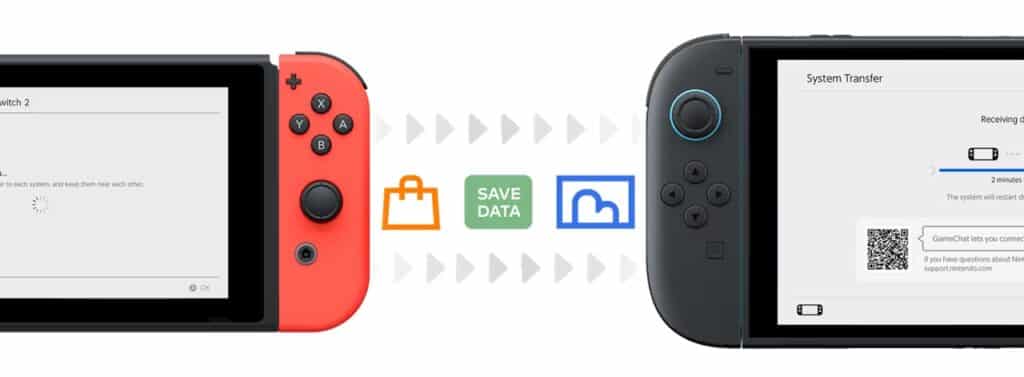
Option 1: Transfer Using Local Communication (Nintendo Switch to Nintendo Switch 2)
This is the fastest way to move your data if you still have both consoles. It works wirelessly, no cables needed. Just make sure both systems are nearby and connected to the internet.
Here’s how to do it:
On your original Nintendo Switch:
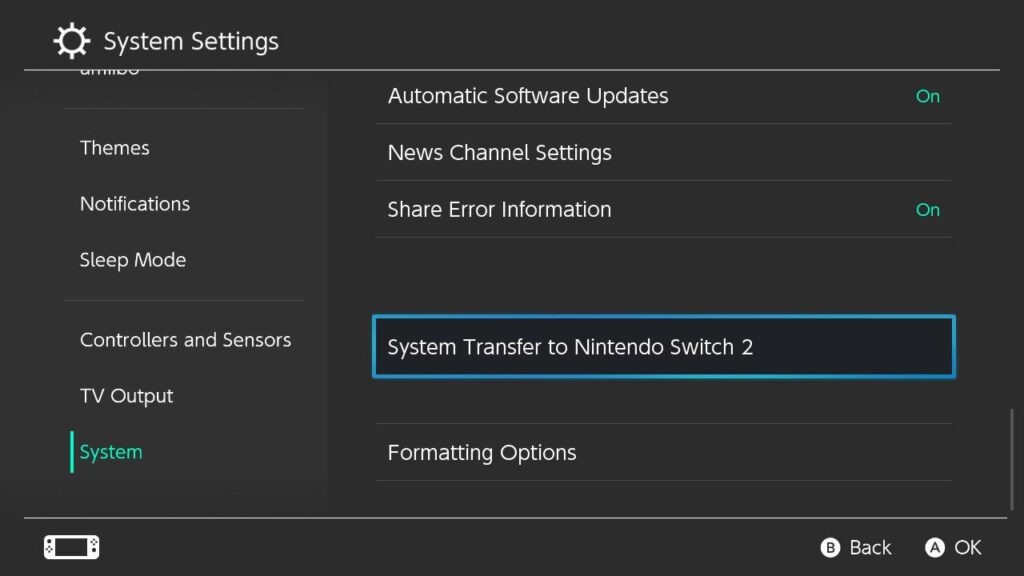
- Go to System Settings from the Home menu.
- Scroll down and select System, then choose System Transfer to Nintendo Switch 2.
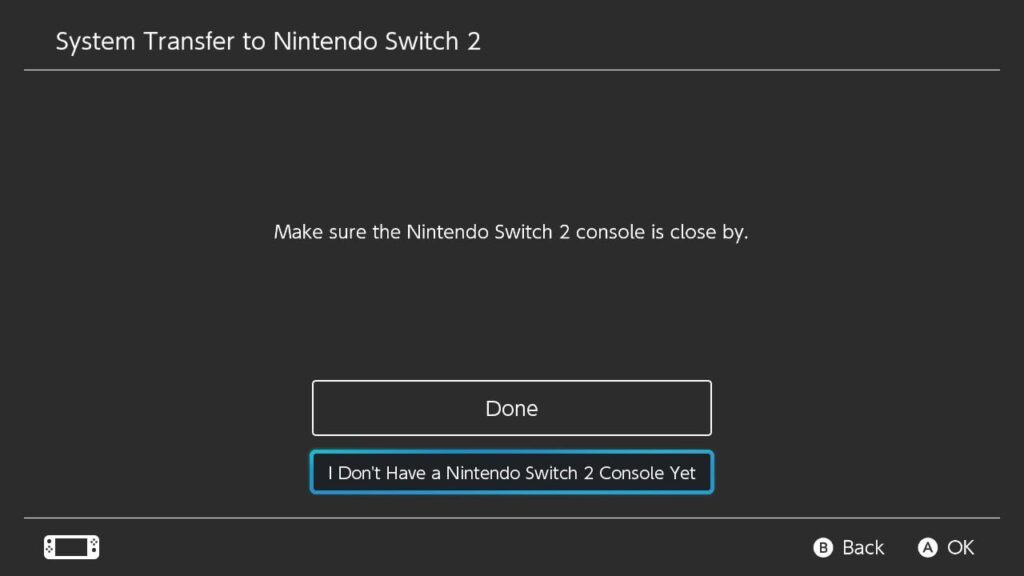
- Select Next, then choose I have both consoles.
- Follow the on-screen steps to prepare the transfer.
On your Nintendo Switch 2:
- Power on the console and begin setup.
- During setup, when asked if you want to transfer data, select Yes.
- Choose Transfer from a nearby console.
- Follow the prompts to sign in with your Nintendo Account and begin the transfer.
The process can take several minutes depending on how much data you’re moving. Once it’s done, your saves, profiles, and settings will be on the new system. Your digital games will automatically start redownloading from the Nintendo eShop.
Option 2: Transfer Using Nintendo’s Server
This method works if you’re trading in your original Switch or don’t have access to both consoles at once. It uploads your data to Nintendo’s servers, so you can download it later on your Nintendo Switch 2. If you use the server transfer method, your original Nintendo Switch will be wiped. Make sure you’re ready before confirming.
On your original Nintendo Switch:
- Open System Settings from the Home menu.
- Scroll down to System, then select System Transfer to Nintendo Switch 2.
- Choose I don’t have a Nintendo Switch 2 yet.
- Read the instructions on screen, then select Next.
- You’ll see a Download Deadline. Make sure you complete the transfer to your Nintendo Switch 2 before this date.
- Follow the prompts and sign in to your Nintendo Account if needed.
- Choose Upload Data.
- Once the upload finishes, select OK and review the info.
- When ready, choose Start Initialization. This wipes your console and resets it to factory settings.
Now your data is backed up and ready to download on your new console.
On your Nintendo Switch 2:
- Power it on and start setup.
- During setup, when asked, choose Yes to transfer data.
- Select Download from Nintendo’s server.
- Sign in to the same Nintendo Account used on your original system.
- Follow the prompts to download your data.
Once complete, your games, saves, and account should all be set up. Your digital games will automatically start redownloading from the Nintendo eShop.
How to Cancel a Server System Transfer
You can cancel a server system transfer during setup, but you’ll need to use the same type of console that started it. For example, if the upload was done on a Nintendo Switch Lite, the cancellation also needs to happen on a Switch Lite.
Here’s how to do it:
- Turn on your Nintendo Switch 2 and begin the setup process.
- When you reach the Select Time Zone screen, press and hold the Left Stick or Right Stick along with the + or – Button for at least two seconds.
- Choose your time zone and continue setup.
- Sign in with the Nintendo Account that was used to start the transfer.
- Follow the prompts to finish setup without downloading the saved transfer data.
Some things, like digital downloads and Parental Controls, may need to be set up again afterward.
How to Check the Status of Your Server Transfer
Once you’ve uploaded your data to Nintendo’s servers, you can check the status anytime through your Nintendo Account.
Here’s how to do it:
- Visit the Nintendo Account website.
- Sign in with the same account used for the transfer.
- Select Game Systems from your account menu.
- Choose System Transfers.
You’ll see any transfers linked to your account and how long the data will remain available.
Transferring Your Data from Nintendo Switch to Switch 2 Is as Easy as 1-2-3
Whether you’re upgrading with both consoles in front of you or moving on from your original Switch, the transfer process is straightforward once you know the steps.
Take your time, follow the method that fits your situation, and make sure you’re signed in with the right Nintendo Account. Once it’s all done, your Nintendo Switch 2 will be ready to go with all your save data and settings in place. Now you’re ready to jump into Mario Kart World and have some fun!
As always, remember to follow us on our social media platforms (e.g., Threads, X (Twitter), Bluesky, YouTube, and Facebook) to stay up-to-date with the latest news. This website contains affiliate links. We may receive a commission when you click on these links and make a purchase, at no extra cost to you. We are an independent site, and the opinions expressed here are our own.